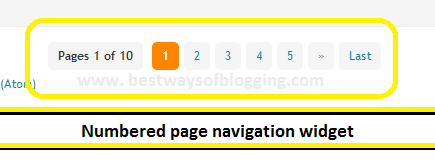
Numbered page navigator is an awesome widget which will make your blog looks more professional. In this tutorial I will show you how to add numbered page navigator in your blogger blog. This widget will be placed below your posts and only shown on homepage. Actually we will replace this widget with ‘Older Post’ and ‘Newer Post’ section of blogger. There are a lot benefits of placing this widget.
Follow the steps below to add page navigation widget in your blogger blog.
1. Login to your Blogger dashboard
2. Go to Template --> Edit HTML ( Must back up your template before making any changes)
3. Now you need to add CSS codes. Find the code below. Use CTRL+F to search
2. To change the hover color go to the codes of step 4 and find the codes below. Change the #ff8400 with your desired color. Use colorpicker.com to get the code of your color.
This widget is attractive but this widget has disadvantages too. It will make your blog loading speed slow. So I recommend to use the 'Older Post' and 'Newer Post' widget instead of it.
If you are facing any problem with this widget feel free to inform me through comment form. If the coding has any problem please inform me. Also feel free to share your design with us.
Advantages of numbered post navigation
- It’s easy to navigate your blog posts with numbered post navigator. You can jump to any page you want.
- This widget is attractive and will help you to get more page views.
- This widget will make your blog looks more professional.
Adding Page Navigation widget
Follow the steps below to add page navigation widget in your blogger blog.
1. Login to your Blogger dashboard
2. Go to Template --> Edit HTML ( Must back up your template before making any changes)
3. Now you need to add CSS codes. Find the code below. Use CTRL+F to search
]]></b:skin>
4. Now above ]]></b:skin> paste the codes below.
.pagenavi{
clear:both;margin:10px auto;text-align:center
}
.pagenavi span,.pagenavi a{
padding:10px;
margin-right:5px;
padding-top:5px;
padding-bottom:5px;
background:#FFFFFF;
-webkit-border-radius: 5px;
-moz-border-radius: 5px;
border-radius: 5px;
}
.pagenavi a:hover,.pagenavi .current{
background:#ff8400;color:#fff;text-decoration:none
}
.pagenavi .pages,.pagenavi .current{
font-weight:bold
}
.pagenavi .pages{border:none}
5. Again find the codes belowclear:both;margin:10px auto;text-align:center
}
.pagenavi span,.pagenavi a{
padding:10px;
margin-right:5px;
padding-top:5px;
padding-bottom:5px;
background:#FFFFFF;
-webkit-border-radius: 5px;
-moz-border-radius: 5px;
border-radius: 5px;
}
.pagenavi a:hover,.pagenavi .current{
background:#ff8400;color:#fff;text-decoration:none
}
.pagenavi .pages,.pagenavi .current{
font-weight:bold
}
.pagenavi .pages{border:none}
<b:widget id='Blog1' locked='true' title='Blog Posts' type='Blog'>
6. Paste the codes below after above codes
<b:includable id='page-navi'>
<div class="pagenavi">
<script type="text/javascript">
var pageNaviConf = {
perPage: 5,
numPages: 5,
firstText: "First",
lastText: "Last",
nextText: "»",
prevText: "«" }
</script>
<script type="text/javascript" src="http://yourjavascript.com/9114941310/navigation.js"></script>
<div class="clear" />
</div>
</b:includable>
7. Find the codes below<div class="pagenavi">
<script type="text/javascript">
var pageNaviConf = {
perPage: 5,
numPages: 5,
firstText: "First",
lastText: "Last",
nextText: "»",
prevText: "«" }
</script>
<script type="text/javascript" src="http://yourjavascript.com/9114941310/navigation.js"></script>
<div class="clear" />
</div>
</b:includable>
<b:include name='nextprev'/>
8. Replace it with the codes below
<b:if cond='data:blog.pageType == "index"'>
<b:include name='page-navi' />
<b:else/>
<b:if cond='data:blog.pageType == "archive"'>
<b:include name='page-navi' />
</b:if>
</b:if>
9. Now preview your templates. If it is OK then save the templates. If not then click on ‘Revert Changes’ and start from the step 1 again.<b:include name='page-navi' />
<b:else/>
<b:if cond='data:blog.pageType == "archive"'>
<b:include name='page-navi' />
</b:if>
</b:if>
Customizing This Widget
1. If you want to change background color then go to codes of step 4 and find background:#FFFFFF; . Now change the #FFFFFF with your color. Get the code of your color from www.colorpicker.com.2. To change the hover color go to the codes of step 4 and find the codes below. Change the #ff8400 with your desired color. Use colorpicker.com to get the code of your color.
.pagenavi a:hover,.pagenavi .current{
background:#ff8400;color:#fff;text-decoration:none
}
3. If you want to change the number of post shown per page then go to the codes of step 6 and find perPage: 5 . Change the number 5 with your desired number and you will be done.background:#ff8400;color:#fff;text-decoration:none
}
Disadvantages of This Widget
This widget is attractive but this widget has disadvantages too. It will make your blog loading speed slow. So I recommend to use the 'Older Post' and 'Newer Post' widget instead of it.
Conclusion
If you are facing any problem with this widget feel free to inform me through comment form. If the coding has any problem please inform me. Also feel free to share your design with us.


Post a Comment